The concept and technique of placing ice screws have changed a lot to this day. Gone are the days when climbers used to ice climb and hang from a leash and wrestle in a 22 cm screw. This process used is certainly enough to pump out energy while climbing.
The new age ice tool is far better and the screws have “express” knobs which are undoubtedly a lot higher quality. Also, the placement of ice screws has evolved with time.
That being said, still there are lots of variations when it comes to finding quick solid ice for screw placement. Different considerations come in the way and these are body orientation and timeliness. These are significant parts of your venture especially when you are climbing steeper terrains in the midst of other climbers. Be efficient in ice screw placement and your confidence will automatically increase. This will help you in leading a pitch and conserve the energy for the rest of the steeper sections on the way.
The significance of ice screw placement when ice climbing
Be noted that ice climbing is not that complicated if you know how to perform things in the right way. Even some experienced climbers start their way to the top without carrying any additional gear. They simply depend on ice screws and proper placement. It is certainly life-saving knowledge for every climber.
Finding a favorable location
To begin with, ice screw placement is all about finding solid patches of ice where the screws will be screwed in. This will help you in overcoming challenging climbs. The best choice is to find a natural depression. This is because the chances of fracture lines here (caused by the screw) will not likely reach the surface.
On the contrary, a screw placed into an ice bulge is prone to accidents. It causes major fractures in the ice that actually weaken the placement and eventually make the area useless. In such cases, it is recommended to move the screw a foot or two away from the spot and try again. As a rule of thumb, choose screw placement that is a minimum of 2 feet apart. This is important especially when you are facing rotten ice. The distance between the two placements ensures safety as it reduces the chance of fracture lines (from point A) reaching another (to point B) and eventually weakening both placements.
The basics of screw placement
The procedures of screw placement keep changing with the ice conditions. However, the basic approach is the same in every scenario – this is to punch in a small piercing hole through which the screw will be inserted. This can be done with the help of a spike or pick of a hand tool. The motive is to ensure a strong and robust grip for the starting threads of the screw. The hole should be made with light and gentle taps to avoid fractures on the ice.
Place ice screws through the hole at an uphill angle of 45 to 60 degrees. This should be done against the anticipated pull direction. In case of thin ice with a topping layer of rotten ice or soft snow, simply scrape down the surface with the help of an adze tool to unearth the hard area. It is always smart to find hard surfaces when making the starting hole.
In the case of extremely rotten ice, make sure to make a large horizontal step to place the screw vertically right at the back of the step. Also, you need to press the screw firmly and twist it to achieve a strong grip.
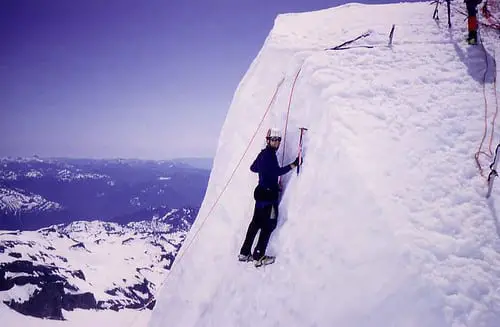
Placing the ice screws
Perfect screw placement is when the height of the same is at your waist level. Adjust to a position from where you can reach the spot without even requiring you to lift your arms or turn too much. Install the screws with your stronger hand while on the other hand holding on to an axe to ensure support.
To ensure stability, press your crampons and axe deeper into the ice, just in case of the ice screw fails. If possible, turn your foot slightly towards the direction of the installation to increase the holding power. This will ensure further stability. As a rule of thumb, it’s good to practice installing screws with both hands. Because practically, during tougher climbs you may end up in spots where the installation needs to be done with your weaker hand.
What length of screw proves strong?
There are various lengths of ice screws. Basic instinct always indicates screws that are longer. Well, that is not always true as the scenarios keep changing based on the ice condition. Climbers experience different types of ice conditions and some of them are aerated, cauliflowered, hollow, chandeliered, detached or slushy.
So, does this mean that you always require the longest screw for ice climbing? Most scenarios will point towards longer screws, but not necessarily in every case. There are different factors that come along the way.
These are:
- How much ice do you need to remove from the surface to unearth good patches?
- How much good ice is left underneath the top surface?
- How pumped are you while placing one screw?
- Is the screw placement the sole protection you have for some distance?
- How belay or far from the ground are you?
Ice climbers recommend choosing a length that keeps you comfortable in regards to safety level and pump factor. If you are close to the ground or belay, there is a higher potency to generate more force to ensure protection. The placements can also be in the form of bomber anchors. You can use longer screws when you are close to belay. If you are unsure of the ice quality, you can also switch to installing two screws in two different spots to increase the safety level.
Final words
The information shared here is the basic approach to screw placement and installation. In real-life situations, you may need to use your intuitive indicators. There is absolutely no one-size-fits-all in assessing safety when it comes to ice climbing. So, it’s better to keep practicing and growing with your experience.
Disclaimer:
The content provided above is for educational purposes only and should not be used as a substitute for professional advice. Climbing ice is inherently dangerous and can lead to serious injury or death, so it is essential that climbers receive instruction from certified professionals before attempting any activity.